Recently I was lucky enough to be involved in a project where I was been asked to create illustrated cartoon characters. I’ve always enjoyed the process of illustrating. As a kid I used to spend hours drawing monster trucks and animals. I can still visualize the thick, off-white paper and the feel of crayons and pencils as I dragged them heavily across the rough surface on the sheet.
Well things have definitely changed. When it comes to illustration projects here at the agency the pencil and paper are just the beginning brainstorming and development stage, before it was the beginning AND the end. One thing is the same. I still enjoy the process and find it rewarding to see the finished piece.
I was recently talking with a friend here at C360 and he mentioned he would like to know how take his sketches from paper to digital, so I thought I would give a condensed tutorial on how I create digital illustrations. Here it goes.
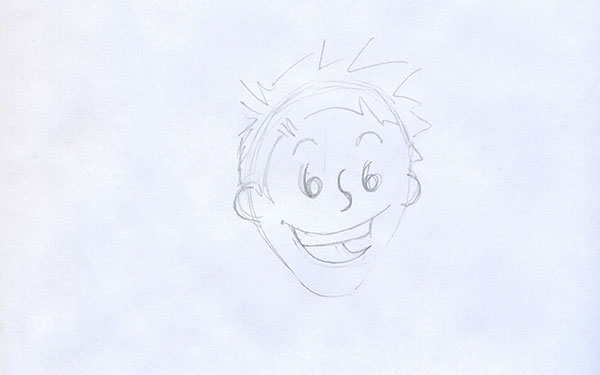
Step 1: Sketches.
Draw something. This is the o.g. pencil and paper stage. Brainstorm and get your ideas out and onto the paper. It doesn’t matter how rough or messy the sketches are during this stage of the process. You’re just trying to get something you like.
Step 2: Ink.
After you have something you like it needs to be cleaned up and prepped for scanning.
There are a few things that really help make this step easy: tracing paper and good artist pens, usually a brush tip and a fine tip will suffice. Trace the original drawing. When using the pens try to retain all the variations within the lines. Try to use the brush tip pen with varying pressure in order to keep the hand drawn look of the original lines. Redrawing with ink will create a better image when scanning.
Step 3: Scan.
This step is pretty self explanatory. Just make sure your scanning at a good resolution (300dpi).

Step 4: Photoshop.
Here is were a few expensive programs begin to make things a bit easier (or more complicated, depends on how how you look at it.) Open the file of the scanned illustration using Photoshop. There are two things to try to accomplish during this step.
First, try to adjust levels to achieve truer whites and blacks. There are a few ways to do this. Here’s one way to try. In the menu bar choose image> Mode > greyscale. Then add a curves or levels adjustment layer. You find adjustment layers through the menu bar, Layer >new adjustment layer > curves, or by opening an adjustments window through the window menu bar option. Toy around with the adjustment layer until you’ve achieved pretty clean whites and sharp blacks. The trick is to find the right balance and not distort the illustration.
The second step is to separate the illustration into sections or groups. An example of what I mean by this would be to put hair, face, arms, legs, & body on separate layers. This isn’t a necessary step. It just makes things a little easier later when it comes to color or positioning.
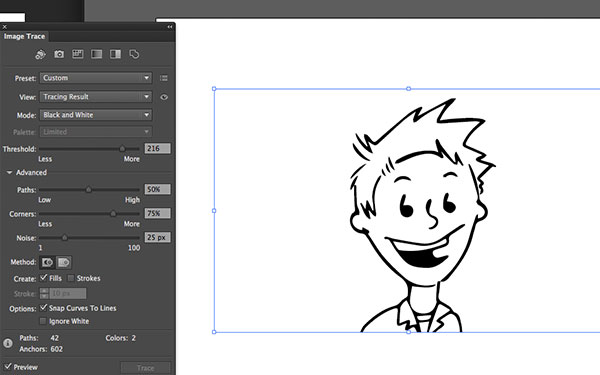
Step 5: Illustrator.

Now it’s time to convert the illustration into a vector format. This will allow for the illustration to be resized without loss of resolution and make it easier to add color. Open a new file in illustrator. Using the photoshop file that you have been working on select a layer and drag it onto the new illustrator window (it’s easiest if you have both files open and positioned next to each other so that you can view both at the same time). The image should then appear on the illustrator page. In the illustrator menu bar select window >image trace. This will open up a small option window tracing the image. This window contains a variety of preset tracing options. Select the image to be traced and them in the image trace window select the option of black and white logo. Hit the trace button at the bottom of the window. The image is now vector, but you can you can’t change any of its characteristics until you expand it. If you have the image selected you will see an expand button in the top menu bar. Select that button and presto! Individual, editable objects are created.
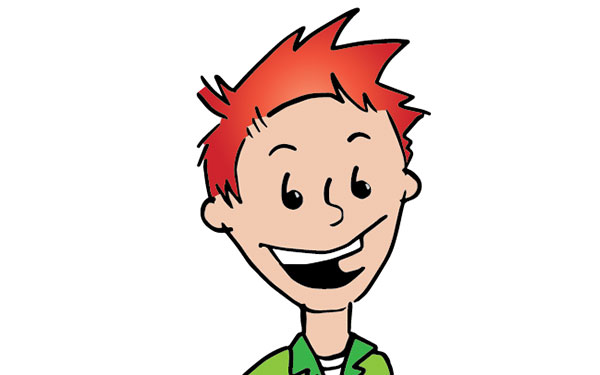
Step 6: Color.
This is the last step. Select the image (should be grouped together) and in the menu bar select object >live trace >make. Now using the live paint tool (accessible in the tool bar) you can add color fills to the illustration. By hovering over the illustration with the live paint tool particular areas/objects will be highlighted. If you click on the area while highlighted it will fill that object with the color selected.
 One thing to note. Usually after tracing an image there will be a large white frame around the entire illustration. This is the part of the art board from photoshop. You can do two things to eliminate this. First using the direct select tool you can choose a corner point and hit the delete button twice or using the direct select tool, select a corner point and choose no fill in the color palette. Both will remove the large white frame. If you like, add some highlights and shadows and then you’re done.
There you have it from paper to digital. This may seem a bit confusing the first time you attempt it, but after a couple times you’ll be able to fly through these steps like an old pro.

Mobile-First Marketing: Why It’s Essential Today
Not long ago, mobile optimization was viewed as a competitive advantage—a forward-thinking enhancement for brands looking to stay ahead. Today, it’s the foundation. For most consumers, the mobile experience is the internet, shaping how they discover, engage with, and connect to brands every day.